A Pantry Organization System That Actually Works
Is your pantry a source of stress? We will guide you through setting up a simple, sustainable organization system that makes finding ingredients a joy.
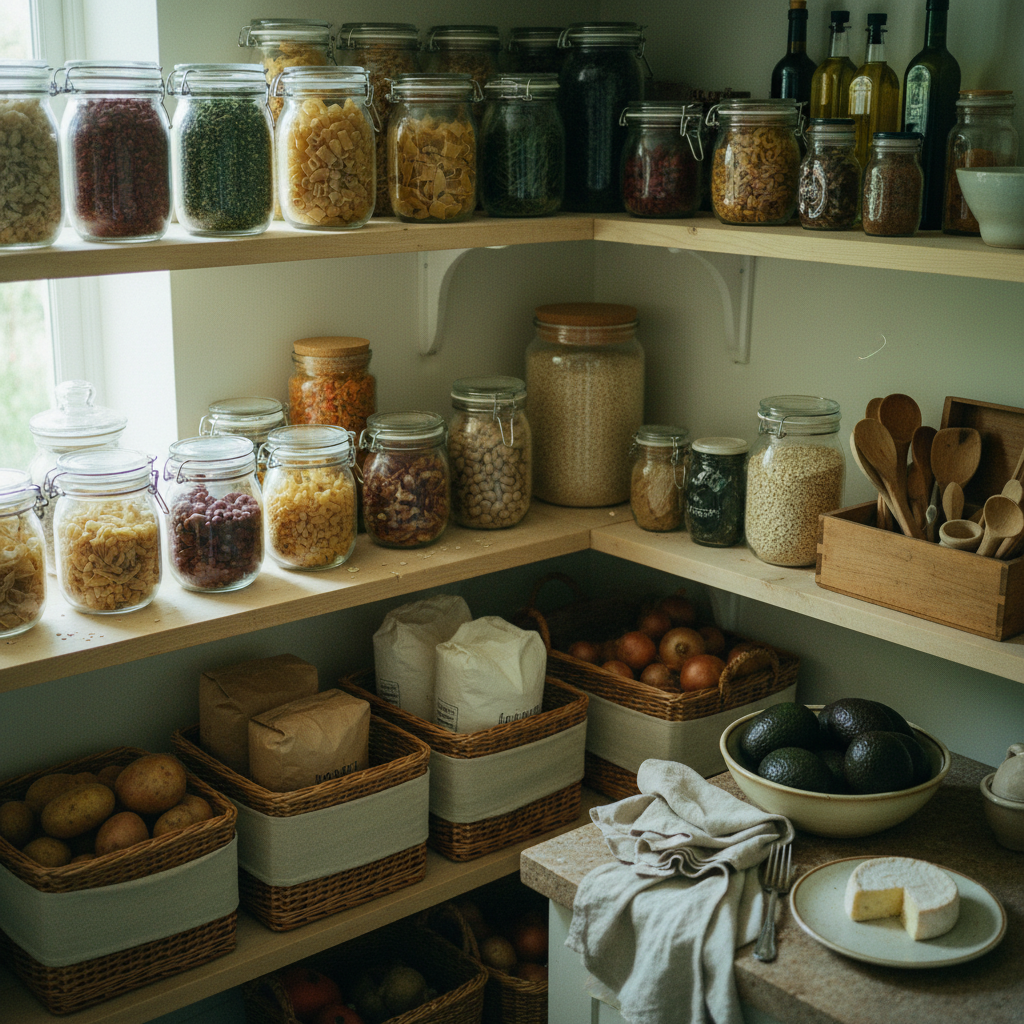
A pantry organization system is a method for arranging your food items to maximize space, reduce waste, and make cooking more efficient. It involves decluttering, grouping like items into zones, using clear containers, and labeling everything. This approach transforms your pantry from a chaotic closet into a functional part of your kitchen, saving you time and stress when you reach for an ingredient and helping you cook smarter.
We have all been there. You are halfway through a recipe when you realize you need a can of chickpeas. You open the pantry door and are met with a wall of chaos. Bags are tipped over, boxes are half-empty, and the chickpeas are nowhere to be found. Ten minutes later, you find them behind a bag of expired lentils, and your cooking momentum is gone.
A disorganized pantry is more than just an eyesore; it is a roadblock to enjoyable, efficient cooking. It causes stress, leads to food waste, and can even discourage you from cooking at all. But what if your pantry could be a source of calm and inspiration? It can, with a good system.
Building a pantry organization system is not about achieving a picture-perfect, color-coded space overnight. It is about creating a logical, functional framework that works for you and your family. It is a one-time project with lasting benefits that will make every trip to the pantry a little easier.
What Is a Pantry Organization System?
A pantry organization system is a deliberate method for arranging and storing your non-perishable food items. Unlike simply tidying up, a system is based on a set of principles designed to make your pantry easy to use and maintain. Its primary goals are to give every item a designated home, make ingredients easy to find, help you keep track of inventory, and reduce food spoilage.
A good system should be tailored to your cooking habits. If you bake a lot, you will want a dedicated baking zone. If your family relies on quick weeknight meals, a section for pasta, grains, and jarred sauces will be essential. The key is to stop thinking of your pantry as a simple storage closet and start treating it as a functional extension of your kitchen workspace.
Step 1: The Great Pantry Purge
You cannot organize clutter. The first, most crucial step is to take everything out. Yes, everything. This is the only way to see what you truly have. Arm yourself with a trash can, a recycling bin, and a box for donations.
1. **Empty the shelves.** Take every single item out of your pantry and place it on a counter or table. This will feel overwhelming, but it is a necessary reset. 2. **Clean the space.** With the pantry empty, give it a thorough cleaning. Wipe down shelves, sweep the floor, and get rid of any dust or old spills. 3. **Sort and decide.** Go through your items one by one. Check expiration dates. Be honest with yourself. Are you ever going to use that tin of smoked oysters you bought on a whim? Create three piles: Keep, Toss (for expired or spoiled items), and Donate (for unexpired food you know you will not use).
This process is liberating. It clears the physical and mental space needed to build your new system from a clean slate.
Step 2: Creating Your Pantry Zones
Now that you only have the items you want to keep, it is time to give them a home. The most effective way to do this is by creating zones. Zoning simply means grouping similar items together. This is the logic that will make your system intuitive.
Think about how you cook and what you reach for most often. Your zones will be unique to you, but here are some common categories to get you started:
* **Weeknight Dinners:** Pasta, rice, quinoa, canned tomatoes, broths, and pasta sauces. * **Baking Supplies:** Flours, sugars, baking soda, baking powder, chocolate chips, vanilla extract, and sprinkles. * **Oils and Vinegars:** Olive oil, vegetable oil, sesame oil, balsamic vinegar, and apple cider vinegar. * **Breakfast Items:** Cereal, oatmeal, granola, pancake mix, and syrup. * **Snacks:** Crackers, chips, pretzels, nuts, and granola bars. Often best kept on a lower, easily accessible shelf for kids. * **Canned Goods:** Beans, vegetables, tuna, and soups. Use tiered risers so you can see every can. * **Spices:** Group them together in a drawer, bin, or on a spice rack. Keep them away from the heat of the stove.
Once you have your categories, assign a specific shelf or area in your pantry for each zone. Place frequently used zones, like weeknight dinner supplies, in the most accessible, eye-level spots.
Step 3: Choosing the Right Containers
Containers are what elevate your pantry from tidy to truly organized. They create uniformity, protect food from pests and staleness, and often save a surprising amount of space.
**Decanting vs. Keeping Original Packaging**
Decanting means moving food from its original bag or box into a dedicated container. Why does this work? Airtight, clear containers let you see exactly how much you have left at a glance, making grocery lists easier. They also keep things like flour, sugar, and crackers fresher for longer. Finally, uniform, stackable containers eliminate the wasted space created by bulky, half-empty packaging.
However, decanting is not for everyone. It takes time and effort. If you prefer a simpler approach, you can use open-top bins or baskets to corral items in their original packaging. For example, place all your bags of pasta in one bin and all your snack bags in another. This still applies the zoning principle and prevents smaller items from getting lost.
Choose clear containers whenever possible. Whether you use glass jars or plastic canisters, being able to see the contents without opening a lid is a game-changer.
Step 4: The Final Touch - Label Everything
This step is non-negotiable. Labeling is the glue that holds your entire system together. It removes all guesswork for you and anyone else using the kitchen. You will never again mistake baking soda for powdered sugar.
A simple label maker is a great tool, but you do not need one. A roll of masking tape and a permanent marker work just as well. When you decant an item, make sure to write two things on the label: the name of the item and its expiration date. You can write the date on the back or bottom of the container.
How to Maintain Your Organized Pantry
An organized pantry will not stay that way on its own. The good news is that maintenance is easy once the system is in place.
1. **Follow the 1-Minute Rule.** When you put groceries away, take the extra minute to put things back in their designated zone. Put new items behind older ones (First In, First Out) to ensure you use up older stock first. 2. **Keep a Running List.** When you notice an item is running low, add it to your shopping list immediately. A magnetic notepad on the fridge or a shared note on your phone is perfect for this. 3. **Do a 5-Minute Tidy-Up.** Before a big grocery trip, take five minutes to quickly straighten up your pantry shelves. This makes it easier to see what you need and provides space to put away new items properly.
A well-organized pantry is a gift you give your future self. It brings a sense of calm to the kitchen, reduces food waste, and makes the daily act of preparing a meal simpler and more enjoyable.
Inspired by reporting from Kitchen Tutor.
Frequently asked
- How often should I reorganize my pantry?
- A deep reorganization, including a full purge and clean, is best done once or twice a year. For maintenance, a quick 5-10 minute tidy-up every couple of weeks will keep your system running smoothly. This helps you catch any items that have strayed from their zones and lets you wipe up small spills before they become bigger messes.
- Is it really necessary to buy special containers?
- No, it is not strictly necessary, but it helps. Clear, airtight containers keep food fresh, make inventory visible, and maximize space. However, you can achieve great results by starting with what you have. Reuse glass jars or use simple baskets and bins to group items in their original packaging. The goal is function, not a perfect aesthetic.
- What is the 'zoning' method for pantries?
- Pantry zoning is the practice of grouping similar items together in designated areas or 'zones'. For instance, you might create a 'baking zone' with flour, sugar, and extracts, and a 'breakfast zone' with cereal and oats. This method turns your pantry into a logical map, making it much faster to find all the ingredients you need for a specific task or meal.
- I have a very small pantry. How can I maximize space?
- For a small pantry, think vertically. Add extra shelving, under-shelf baskets, or use an over-the-door organizer for spices and small jars. Decanting dry goods into uniform, stackable containers is especially effective in tight spaces. Also, be ruthless during your purge; a small pantry cannot afford to store items you do not use regularly.
- What's the best way to store spices?
- Spices last longest when stored in a cool, dark, dry place away from the heat and steam of your stove. A dedicated drawer with an insert, a tiered rack inside a cabinet, or small bins are all excellent options. Organizing them alphabetically or by frequency of use will save you from hunting for the cumin every time you need it.